Short answer: You can buy Instagram shares, saves and reposts with UPI on InstaBoost without signing up: choose the service, paste a public post link, set the quantity and pay the exact rupee total in Google Pay, PhonePe, Paytm or any UPI app through Razorpay. The smallest payments are ₹2 for 100 shares, ₹8 for 10 reposts and ₹21 for 50 saves.
Can you pay for Instagram shares, saves and reposts with UPI?
Yes. Every InstaBoost order is paid through Razorpay, a payment gateway used by many Indian websites. It accepts UPI apps such as Google Pay, PhonePe and Paytm, and also cards and NetBanking if you prefer them.
The order form asks for only three things: the service, the Instagram link and the quantity. There is no account, no email signup and no Instagram password anywhere in the process. Once you pay, the order is placed and nothing about your payment method is kept on our site.
Paying with UPI also means the money leaves your bank account only when you approve it inside your own UPI app with your UPI PIN. Nobody on a website ever needs that PIN.
Exact UPI amounts for every pack
This table shows what the order form charges, read from the live form on 8 October 2026. The rates are ₹17 per 1,000 shares, ₹420 per 1,000 saves and ₹750 per 1,000 reposts, and every total is rounded to the nearest rupee before you pay. The amount you approve in your UPI app is the same amount shown on the form.
Each service has its own minimum: 100 shares, 50 saves or 10 reposts. That is why some cells below say 'below minimum'.
You can also pay for a post that is not on your own account, for example a client's Reel that you manage. The UPI app you pay from does not have to belong to the Instagram account, because the order needs only the public link, never a login.
| Quantity | Shares | Saves | Reposts |
|---|---|---|---|
| 10 | below minimum | below minimum | ₹8 |
| 50 | below minimum | ₹21 | ₹38 |
| 100 | ₹2 | ₹42 | ₹75 |
| 500 | ₹9 | ₹210 | ₹375 |
| 1,000 | ₹17 | ₹420 | ₹750 |
| 5,000 | ₹85 | ₹2,100 | ₹3,750 |
Pay ₹2 for 100 shares by UPI →
Checkout in 4 steps
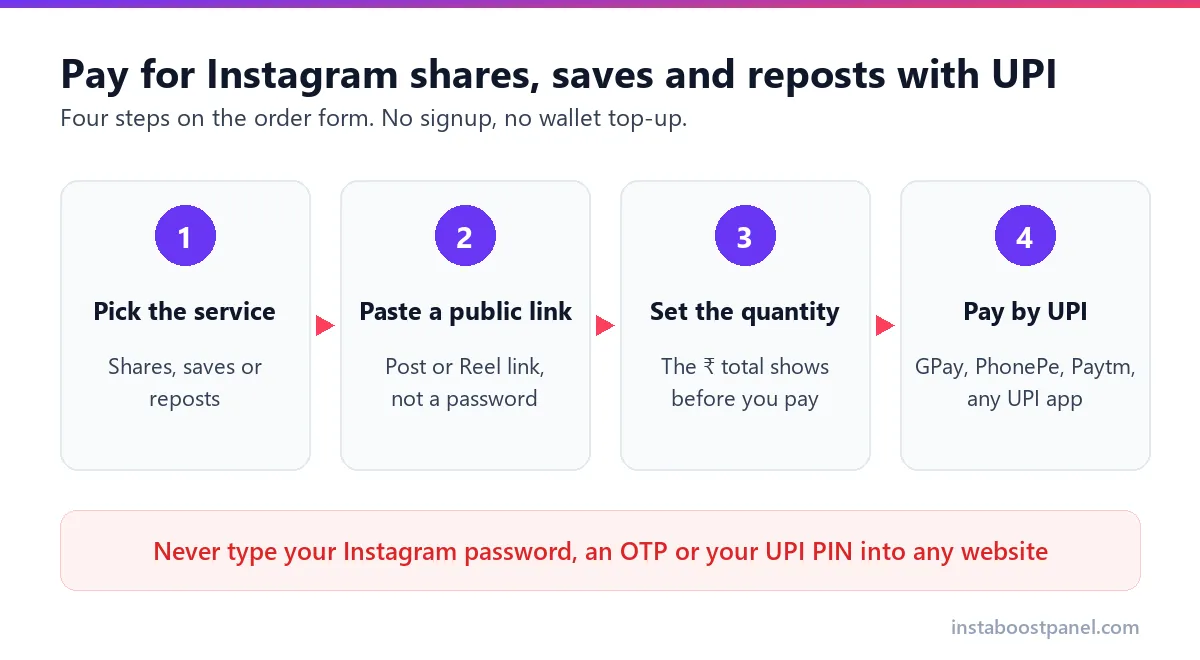
Paying with UPI takes four steps on the order form. The picture below shows them, and each step is explained underneath.
1. Pick the service. Choose shares, saves or reposts from the service list. The form switches its minimum automatically, so you cannot order fewer than the service allows.
2. Paste a public link. Copy the link of the post or Reel from Instagram's Share menu and paste it in. The account has to stay public until the order is delivered.
3. Set the quantity. Type the number you want. The rupee total updates as you type, so you see the exact amount before anything is charged.
4. Pay with UPI. Razorpay opens the payment window. Approve it in your UPI app with your PIN, then keep the success screen or the payment ID for your records.
Google Pay, PhonePe, Paytm or a UPI ID: does it matter?
For the order itself it makes no difference. All of these apps work on the same UPI system, so a payment approved in Google Pay reaches us in the same way as one approved in PhonePe or Paytm.
What can differ is how the payment window looks on your device. Depending on your phone or computer, Razorpay lets you pick a UPI app, scan a QR code or type your UPI ID. Use whichever your bank account is linked to and works reliably for you.
If UPI is having a bad day, which happens during bank maintenance, you can switch to a debit card or NetBanking in the same window instead of retrying the same UPI payment again and again.
Most of these orders are small amounts, far inside everyday UPI use. If a larger payment is declined, your bank's own daily UPI limit is a common reason; splitting the purchase into two orders, or paying that one by NetBanking, usually solves it without any change on our side.
What to check before you approve a UPI payment
A few seconds of checking prevents most payment problems. Run through this list every time, on any website, not only ours.
| Check | Why it matters |
|---|---|
| The amount matches the total on the order form | You should never approve more than you saw before paying |
| You enter your UPI PIN only inside your own UPI app | A PIN typed into a website or chat can be misused |
| You are paying through a gateway window, not a personal UPI ID sent over chat | A gateway gives you a receipt and a payment ID |
| You note the payment ID or UPI transaction ID | Support can trace an order with it |
| The link you pasted is a post or Reel, not a profile | The wrong link is not covered by the refund policy |
If money is debited but the order does not appear
First, open your UPI app and look at the transaction status. A payment can show as pending for a while, and a pending payment has not yet reached the merchant. Keep the transaction ID, sometimes called the UTR number, which your app shows on the payment details screen.
Then contact our support with that ID and the time of payment. If you prefer a Hindi walkthrough of the same situation, read UPI payment failed, followers nahi aaye.
When a payment succeeds but the order does not arrive, our refund policy applies: full money back if delivery misses the usual 24-48 hour estimate, part of it back for a partly delivered order, and no refund for private accounts or mistyped links.
Why there is no wallet, signup or saved card
Many SMM panels ask you to create an account and add funds to a wallet before you can order anything. That suits resellers who place dozens of orders a day, but for a creator buying one pack it means money sitting on someone else's website.
InstaBoost charges per order instead. You pay for exactly the quantity you chose, the payment completes inside your UPI app, and there is no balance left behind. If you never come back, nothing of yours is stored with us except the order record.
Paying per order also makes your UPI history easy to read. Every payment line in Google Pay or PhonePe matches one order, so if you ever need to raise a question you can point to the exact transaction, instead of working out which part of a wallet top-up paid for what.
One thing no checkout can change: Meta's spam policy classes buying engagement as spam. Paying by UPI makes the purchase easy, not approved.
Shares, saves or reposts: what should you pay for first?
If you are unsure which service to start with, this table matches common goals with a first UPI payment. It is our suggestion, not a rule. For a deeper price comparison, read shares, saves and reposts price in India.
| Your goal | Start with | First UPI payment |
|---|---|---|
| More people sending a Reel to friends | Shares | ₹2 for 100 |
| A guide or carousel people come back to | Saves | ₹21 for 50 |
| The post showing up on other profiles | Reposts | ₹8 for 10 |
Frequently asked questions
Related guides
Ready to grow your Instagram?
Pick a service, paste a public link and pay by UPI. From ₹2, no signup.
Start Growing Now →